Showing posts with label blog. Show all posts

Friday, February 21, 2014

1 Year Anniversary!!- B3beautybyblanca/ YouTube

Hello Friends!
I'm super excited to share that it has now been one year since I started my channel B3beautybyblanca on YouTube! It's pretty awesome because it was something that I wanted to do, but wasn't sure I'd be good at-because I'm not a pro. I just happened to become pretty much addicted to beauty videos on YouTube; with plenty of time on my hands thought it might be something that I could try to do.

When I started my channel I wasn't expecting to become any YouTube star, which I haven't become- and that's o.k. I asked my friends on Facebook to come over and watch me, which probably sounded pretty annoying. But I'm really grateful to those that did and continue to take the time to watch a video or read my blog. It's really meaningful to get that support and it makes a big difference.

I should explain that I didn't start my channel because I'm egocentric or even think that I'm so beautiful that I can't get over myself....that's far from it! I have always felt normal,regular, I guess?! I do however believe that doing what you like and really enjoy makes you feel good and gives you a particular satisfaction. So, even though I'm not a professional make up artist, I don't have the funds to try the millions of beauty products that I would love to try and be able to tell you how awesome they are-I really enjoy doing this!!

I started the channel in the hopes of having something positive, to keep my mind entertained and distracted from problems/life. Not that I would be escaping reality, but rather bringing some beauty to it-did you catch that ;) ? This seemed like a new adventure when everything seemed to be going wrong. I needed pretty much desperately to feel that I could create, be productive, and learn. I don't know if my make-up techniques are all that great, but I think I've developed them a bit (or I'd like to think so! you can be the judge of that! haha!). When I started doing the videos I had no idea how to edit them,NO CLUE! I won't say that I'm a miracle worker now, but I'm content with the fact that I have learned so much about how to make a video/tutorial. And it's not as easy as it seems when you see it.

When we look at a video/tutorial within the first few seconds have enough time to decipher whether it should be allowed our view or not. Meanwhile, on the other side of the screen preparing, creating, revising the project takes so much time even for a video that will only be a few minutes long.

Well, even at my inexperienced level it has taken a lot of time which I have enjoyed for the most part. I guess the joy doesn't come in knowing that thousands of people will watch the video, rather in the fact that you put the work into it and completed it! I would have loved to have done more with my channel in the past year but because of health reasons I did not feel balanced enough to continuously produce more work (because it is work even if the only thing you earn from it is self satisfaction).

O.k. so this has been stretched a bit long...I have to say THANK YOU again for being supportive!!

-P.S. official date 2/17/13-first video published on YouTube
(I had other issues to attend to this week and had not been able to post this! ahhh!)
-Oh! I saw a beautiful humming bird today in my back yard near the basil plant I like to believe they're good luck and anytime I see one I will make a wish! Hope it works!


Thursday, February 6, 2014

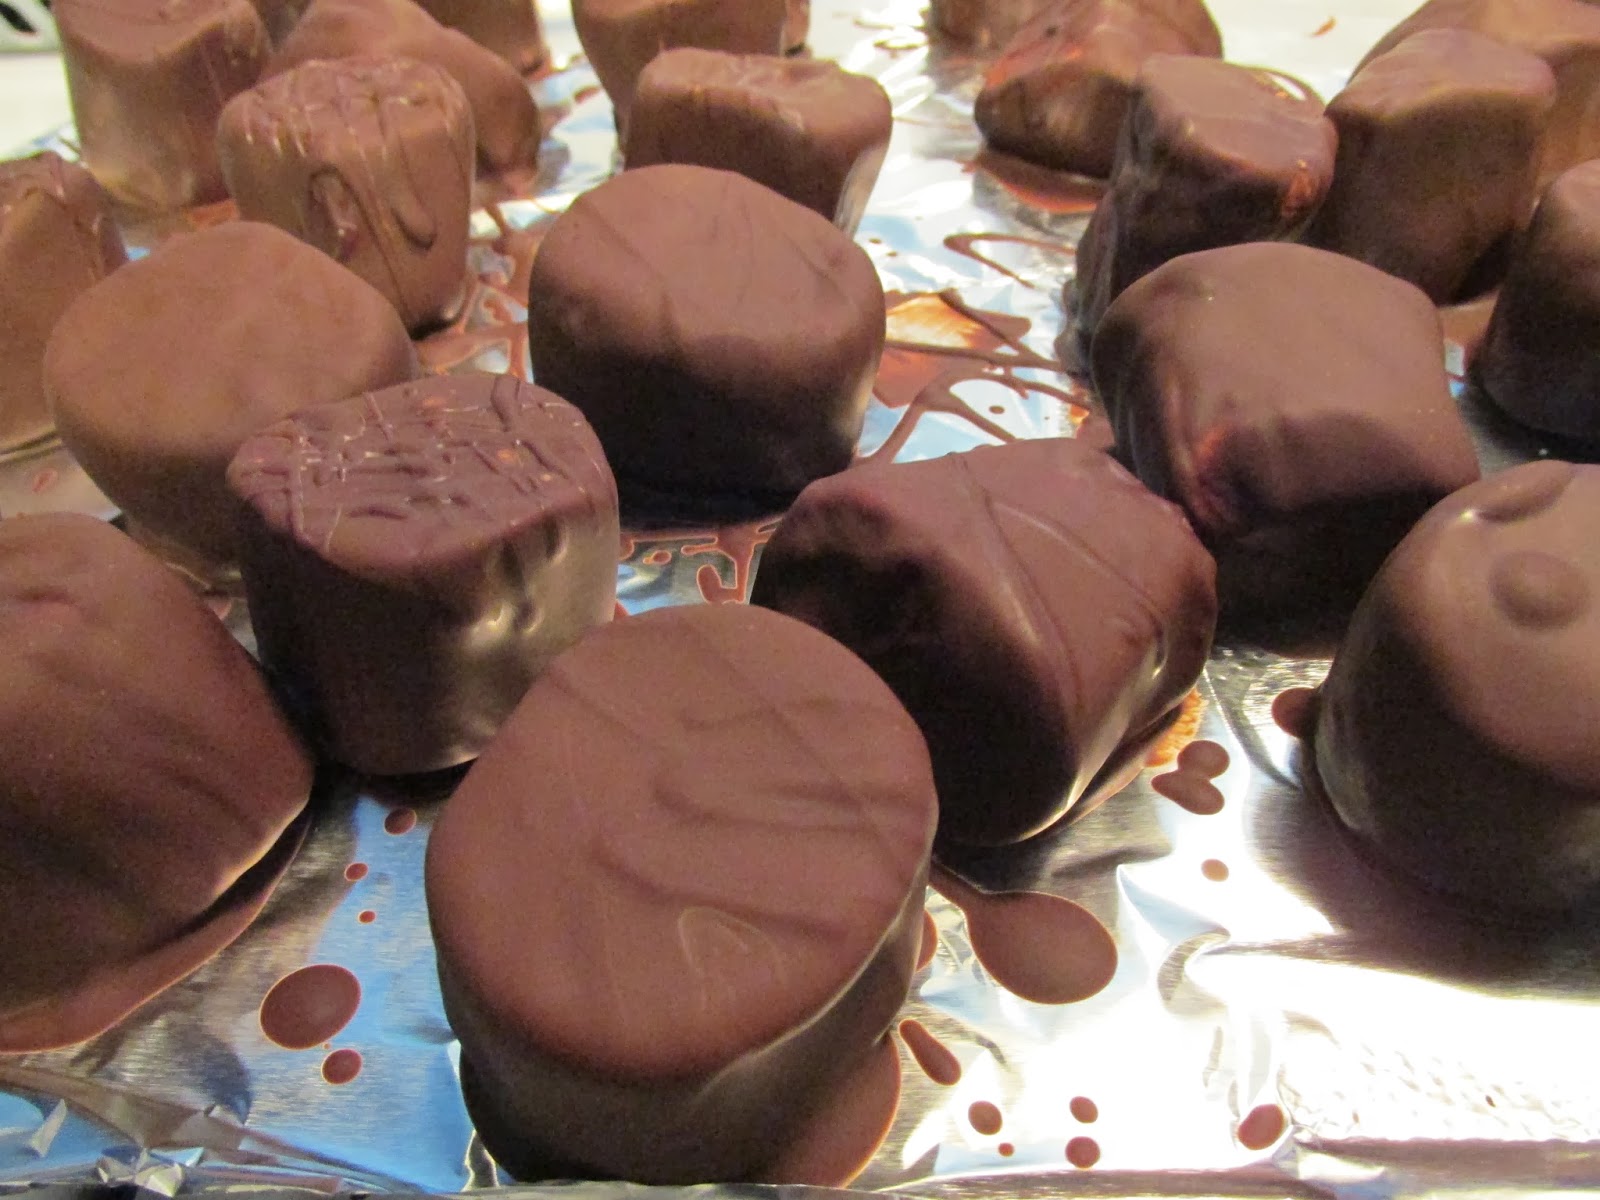
DIY: Chocolate Covered Bonbons


Hello Friends!

Today, I'd like to share a super easy DIY: What's better than bonbons? Well, that's easy chocolate covered bonbons!! I think it can be used for any occasion just by changing up a few things like colored ribbon or any decor you choose.

You will need:
1. Jar with lid/Mason Jar
2.Bonbons
3.Chocolate
4.Large & small pot (to melt the chocolate) details below
 FYI: Both of mine are glass but you can use a regular pot and glass bowl over it
  (whichever you use make sure it's heat resistant)
5.Foil or wax paper
6.Flat board,cookie sheet (to lay the bonbons to harden the chocolate)
7. Curling ribbon, decor

Directions:
1. In a large pot fill with water about 1/4 with water and place the smaller pot inside once the water has warmed up.
2.Place the chocolate inside the smaller pot,at this point you can turn off the fire, as the chocolate will melt with the bath water (don't put the chocolate in the water)
3.Stir until all of your chocolate has melted.
4.Dip your bonbons into the melted chocolate and coat completely using a fork to move them around and to take them out of the chocolate-
5. Hold the bonbon on the fork to let the excess chocolate run and place on your foiled/wax paper sheet (where it will be cooled)
6. Place in the refrigerator 15-20 min (even less) until the chocolate coating has become hard on the oputside
7. Place your chocolate covered bonbons in your jar
8.Decorate your jar (add curling ribbon, adornments, or even write a special message on the jar)

Choose your chocolate: white, dark,milk chocolate (here I have chocolate truffles/dark)

Choose your bonbons: White,colored, small,large (these are large) Keep in mind the smaller they are the longer you will last coating them with the chocolate

Find your jar: basically any jar with a lid, mason jar, heart shaped or other. Keep in mind your choice of decor-if you're adding color/paint on the outside, give it enough time to dry before handling the jar.

Warm up your water and put the chocolate inside the smaller pot (clear of the water). Stir until melted to soft consistency. Keep in mind that you don't want to boil the chocolate,only melt it.

Drop your bonbons 1-2 at a time and coat them completely with your fork. Hold on the fork to drip excess chocolate.


Set your covered chocolate bonbons to cool and harden on flat surface/cookie sheet,cutting board. As an option you can also drizzle the bonbons if you don't want to cover them completely or if you want to do a variation with less chocolate.


Place bonbons in the refrigerator 15-20 (or just until chocolate hardens)


Once  they have been cooled place your bonbons in your jar.


Add your ribbon, decor of your choice before you place your lid on.

And you are done!! I'm sure yours will turn out awesome!! Put your personal touch, whoever receives it will love it!!
This is a very cute idea!! It's delicious and the jar can be used to save other goodies when the bonbons are gone- and that will be fast!!! So, of course you can do this for Valentine's Day! If you don't like dark chocolate, use white chocolate, choose a heart shaped jar, choose a heart and hang it on with the curling ribbon of your choice, or if you're an artist paint your jar-why not? This can be as personal as you want to make it!! Good luck!!

Friday, December 6, 2013

High-Top Bun Hair Tutorial (Hair Donut)

Hi friends! Today I wanted to get this super-quick,easy hair tutorial up for you...just in case you say not another bun tutorial-HEY! You haven't seen mine! So please go watch it. It's perfect for something that looks put together without doing a lot of work. It's gonna make you look fabulous <3 P.S. this eye look will be going up soon!!


Watch the video now!! :))


Please remember to subscribe to my Youtube channel and this blog to stay updated on new videos ;*


Sunday, December 1, 2013

THANK YOU!!!

Hello friends! I hope you all had an amazing Thanksgiving with your families and friends! There are always so many things to be thankful for that many times we take for granted...on that note, I'm very thankful for your continued support by watching my videos and reading my blogs. It has all been a learning process for me and continues to be, but I do feel that my videos have improved a bit. Hopefully you feel the same and continue to watch because it's really awesome to know that someone saw my video and liked it when there are 1 million videos out there that are far superior.

On a more personal level I'd like to share with you....today was completely a wonderful day for me!! I feel beyond ecstatic because I feel that I accomplished so much. It might be because we are in the holiday season that has me feeling so happy, but these last few months have been very difficult for me. I should explain that I have anxiety and it got quite awful. However, today was just awesome I was able to do things that I had not been able to do for a long time. It was a simple step toward my complete health but I feel so optimistic. If you have any similar problems you should know that things do get better. I remember to ask God for strength, inner peace,and just remember that He will be there.

Thank YOU again for being there, hope you all have happy,happy holidays!!


Today was a beautiful sunny day in Los Angeles; I wish I would have taken a picture, but instead I decided to upload the above pic of my Thanksgiving day meal, since I find it would be relevant. 


Remember to subscribe to my blog by submitting your e-mail address and it will be delivered directly to your inbox :))


Tuesday, October 22, 2013

Follow my blog with Bloglovin'

<a href="http://www.bloglovin.com/blog/11112911/?claim=ahzhda9v33u">Follow my blog with Bloglovin</a>

Saturday, October 12, 2013

Creepy-Sad Dolly Makeup/Halloween


Hello friends! Here's another Halloween makeup tutorial! For this one I went with the creepy doll theme...and added a twist after I had trouble adding my circle contact lenses. Everything was looking perfectly well but it turned into a happy surprise when I got completely teary-eyed! I had to go off camera to finally get the circle lenses on and I decided that it just completed the look a lot better and it gave it a more interesting look. At this point it wasn't just a perfect porcelain doll but rather an interesting take; it became a sad-eyed dolly and I do believe it looks a little creepy. This is definitely for those of you that don't like the "pretty" Halloween makeup. These tutorials are just so much fun because it's creating something that you'd never do and the only exception when makeup can do so much more than just make you look pretty. I added a long wig with bangs in the front (fringe) and a black bow on top. I also had to include my Hello Kitty because I happen to like Hello Kitty and it just authenticated the look a bit more ( for me at least). If you decide to go with the teary-eyed look just add eye drops and let them run down your face. But you can always just go with the dolly look if you follow the tutorial to the point before adding the contact lenses. Either way good luck recreating this look, have fun and have a safe Halloween!! 0.0 ........


                                                        Thumbs up/Like, share :)


If you re-create this makeup remember to tag me! I'd love to see your pictures!! Remember to go subscribe to my YouTube channel CLICK HERE!! so that you'll be updated on other looks and of course subscribe to this blog....you know what to do! Just enter your e-mail address to get post delivered to your inbox!! Leave me comments below-What do you think of this look?
 Would you dare wear it?? 


Sunday, October 6, 2013

Spiced-Caramel Apples Recipe

I came up with a little sweet recipe... Just what seemed would taste good together. I had 

never had this before but it turned out pretty good!! So easy & delicious! I made it up as I 

went along and reduced it a bit. It only seemed right to eat with vanilla ice cream!! Of course 

it was the perfect topping!! If you are worried about the liquor, don't fret because alcohol 

evaporates with the heat and leaves just a rich taste behind. Give it a try! Remember to 

share your pictures!


"Spiced-Caramel Apples"

5-small apples peeled & sliced

5-tbs water
5-tbs cognac
4-tbs vanilla
2-cups sugar
2-tsp ground cinnamon
1/2 tsp-salt
1/4-cinnamon stick


Leave me any thoughts below and remember to subscribe to this blog ;)

Friday, September 27, 2013

Fall Eye Look & Bold-Berry Lip

Hi Friends! Today's look is another Fall look...while there is less emphasis on the eyes (sort of) the true star are the berry,bold lips. I say that there is less emphasis on the eyes only because they are very easy to re-create but they do end up looking like you really tried, resulting in a beautiful eye look. This is a bit different from my previous Fall look in the sense that not everyone might be as comfortable with the bold-berry lip. However, it's really flattering and I'm sure you'd have so much fun if you give it a chance...plus you will probably get plenty of compliments!!


                    Products listed below, for a complete guide                                               application follow the video link to my                                                             YouTube channel ;)

                          WATCH THE VIDEO NOW!


e.l.f Eyelid Primer

Maybelline Fit Me Light Concealer

Too Faced Magic Wand Illuminating Foundation Hollywood Med 4

NYX Concealer CJ04 Beige


Milani Baked Bronzer Soleil

NYC Bronzing Face Powder 720A Sunny


Milani Baked Blush 02 Rose D'Oro


Rimmel Stay Matte Pressed Powder 011 Creamy Natural 


e.l.f. Eyebrow Kit Med

Wet n Wild Coloricon Trio I'm Getting Sunburned

NYX Jumbo Eye Pencil 621A Pure Gold

Jordana Best Lash Extreme Volumizing Mascara 301 Black

Lorac Kohl Pencil Brown


Jordana Metalrocks Eyeliner 03 Purple Prism
(yes,I used the eyeliner as lip liner! Beautiful color)

Wet n Wild Sugar Plum Fairy 908C

        Let me know what you think about this tutorial look in the                     comments below!  If you try it out tag me so I can see your                 beautiful faces :) Don't forget to follow my blog!

           CLICK HERE TO SUBSCRIBE TO MY BLOG!


Friday, September 6, 2013

Welcome to my blog!

Hello friends!! I'm very excited to start this blog!! I'm still learning about this process but hope to be including some of the content from my YouTube channel (http://www.youtube.com/user/B3beautybyblanca) along with other randomness! Ahhh! It feels good to start something new, to know that there are brand new exciting things coming in the future; allowing for life to take it's course but definitely making the best decisions to guide your path. <3